Thursday, June 30, 2011

Big News for Scrap with V

Hi everyone

I know that this is all going to come as a real shock to you all as a decision came to me to sell Scrap with V which has now occurred.

Due to changes in my family life, working a new job and renovating a house along with my health issues, teenage daughters and a husband something had to give and unfortunately it was the business. I felt I was letting it down as I could no longer commit 100%

However the great news is that the lovely lady who has bought Scrap with V is quite well known, many of you may already know her. This lovely lady is no other than

Jules the Bling Princess

Julianne McKenna De-Lumen

Julianne has been with Scrap with V since the beginning starting as a beginner in our store to advancing to being on the Design Team for many years and now the proud new owner of Scrap with V.

Please feel free to head over and visit Julianne's personal blog, say hi while you are there, just click here

Jules will start posting here in the next day to introduce herself to you all.

I would like to take this opportunity to thank you all for all your support, friendship and encouragement over the years. It is so sad for me to be writing this because Scrap with V is my baby but I do know that Jules will keep my baby running well and look after you all.

Now, you aren't getting rid of me that easily LOL!! I will be around for sometime, behind the scenes assisting Jules with the website, blog etc until such time...

oh and possibly remaining on the Design Team designing kits etc.

So please make Jules feel welcome, you will love her to bits!!
I hope you will all continue to support Jules as you have me.

Thank you all so much again

Love


Tuesday, June 21, 2011

May Sketch Winners

Hi everyone

Well this is very late indeed so let's not waste any time and announce our winners for the May 1st and 15th Sketches.

May 1 Sketch - the winner is ...

Aileen Herne
with her beautiful layout - Mum


May 15 Sketch - the winner is ...

Pam Casey
with her beautiful layout - Daughter


CONGRATULATIONS LADIES!!

Please email me at scrapwithv@gmail.com with your postal details so I can get your prize packs out to you.

Thank you everyone for participating, as always I am amazed at everyone's creations, making the judges choice very hard each month.

Look forward to seeing more of these beautiful layouts for June's sketches.


Entries for both June sketches close midnight 30th June 2011

Until next time...


Monday, June 20, 2011

Glimmer Mist Resist Technique

Glimmer Mist Resist Technique Journal Boxes by Amy Bender

Would you like to create some custom journal boxes with Glimmer Mist and a Glaze pen?  This technique will appear magically before your eyes!

You will need:
-Glimmer mist in desired journal box color, I used Strawberry Shortcake Chalkboard Glimmer Mist by Tattered Angels
-a white or clear Glaze Pen by Sakura
-a journal box cut from white cardstock, I created mine with the Slice


Using the Glaze Pen, doodle along the edges of the journal box.


Add lines for journaling if desired.


Let the ink from the pen dry completely.  This should only be a few minutes.  The longer it dries, the better the end result will be.

Mist dry journal box with Glimmer Mist using even light coats.


Let the Glimmer Mist dry and watch your doodling magically appear!


You’ve now created a Glimmer Mist Resist Journal Box! 
Enjoy!

Wednesday, June 15, 2011

June 15th Sketch


Hi everyone

We have a fantastic sketch for you this week.

This sketch has been designed by the lovely Eve Sheppard


and here is Eve's gorgeous take on her sketch - Cutie Patootie


check out the awesome inspiration from the team

Lisa Kamphius - So Girly


Nicole Knopke - Family is a work of Heart


Leah Schaeffer - Soar


Kristie Taylor - Beautiful Sunrise


lets see your take on the sketch, all you need to do is create your layout based on the sketch above, upload to your blog and link your post direct to Mr Linky at the bottom of this post and you could win a fantastic prize pack!!

There is still plenty of time to enter the 1st June Sketch too, so why not give both a go and you could win 2 prize packs!! Prize pack for each sketch!!

Winners for May will be announced in the next few days so keep watch.

Until then...


Mister Linky's Magical Widgets -- Auto-Linky widget will appear right here!
This preview will disappear when the widget is displayed on your site.
For best results, use HTML mode to edit this section of the post.

Monday, June 13, 2011

"awesome Blossums"

Hi everyone Kristie here,, I made a flower tutorial , I hope you guys like it.
It is simple, and easy with only a few steps and you end up with two really gorgeous flowers to use on your projects. There are just a couple of things I should say first.. I have made many of these and a strong double sided paper or a cardstock works best.they hold their shape longer and and have much more dimention.Use a strong fast drying paper glue(so you arent stuck there holding your peices together forEVER!)I like Ivy scraps scrap fusion but you could use any fast drying paper glue.
there are a few techniques to make the flowers 3 dimentional
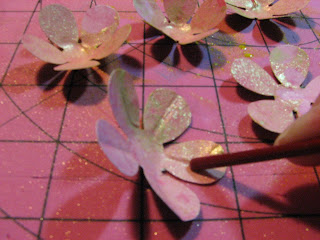
one is "cupping" where you take a blunt object(I use the end of a paintbrush) you place the paintbrush handle down at a 45 degree angle and press till the object cups upward.
two is "shaping" (I use a sharpie) where you rub the petals back and forth to shape the petals
three is "stirring" where you place the sharpie in the center of the flower and stir in a circular motion to make the flower curl upward.
four is "pinching" self explanatory I think ,, just pinch the edges together
okay heres what you need to get started:
-double sided paper or cardstock
-paper punches (I used a large daisy punch,a small daisy punch,a medium snowflake punch and a small sun punch)
-fast drying glue
-scissors
-sharpie marker or other blunt large ended item(for shaping petals)
-paitbrush end or other small blunt ended item(for cupping sun)
-glitter glue/glitter/paint
scoring matt or old mouse pad(a folded towel will work too!)
here is what we are making............

And here are the punches I used


FOR FLOWER #1,five large daisy,one small daisy, one medium snowflake
SPRITZ with water or glimmer mist
"STIR" each petal until they curl
SHAPE each petal by rubbing lenghtwise along the petals

PINCH each petal making a "v" shape

cut each snowflake arm in half to make stamen
SNIP multiple times each set of "leaves"( this will be two of the five large daisy punches that you flip over to a darker side of the paper)
STACK EM UP BABY!! gluing as you go and alternating the position of each daisy punch
WALLL LAHHHH!!
ALL DONE, ISNT SHE JUST GORGEOUS!!!!
okay now you can call that done , or you can add glitter glue/glitter/paint/ink/ markers etc... to make it more realistic.dont worry if it isnt perfect, because sometimes to imperfection makes them more beautiful.
NOW FLOR FLOWER #2..
you just punch four large daisys, and two small suns.
"STIR" the daisys, "CUP" the suns,
"SNIP" multiple times on each petal
STACK em up,, and add glitter.................
TA DAAA
darling, you look MAHHH VALOUS!!
FLOWER #1
flower #2

And now I bid you all farewell...... go forth and make some "awesome blossums""
till next time,
Kristie

Thursday, June 9, 2011

Using your Stamps

Hi all firstly let me apologize for the delay in posting today but work commitments delayed me

Have you ever considered other ways in which to colour your stamped images?

One method I love to use on cards is colouring with a cotton bud and ink pads.

Take your stamp and stamp as normal then take a cotton bud and stamp pad in the colour you like chalk and brilliance pads work magically with this then start to dab the cotton bud into the stamp pad to load the colour onto the cotton bud

Then start dabbing the colour onto the stamped image you can mix the types of inks and pads you use.

Below are some samples of what you can do

Kim


Wednesday, June 1, 2011

June 1st Sketch!

Happy June Everyone!! I hope that this month treats you as well!


Here is this month's Sketch for the 1st of the month! I had fun creating it.


by Amy Bender

Ann

Annette

Irit

Kim

Ness

Valerie
Have a wonderful time!
~Amy Bender
Mister Linky's Magical Widgets -- Auto-Linky widget will appear right here!
This preview will disappear when the widget is displayed on your site.
For best results, use HTML mode to edit this section of the post.