Wednesday, November 30, 2011

Make a Christmas present topper

Hello Everyone! Since it's only 25 days to christmas, I thought I'd show you how to make a present topper. They are super easy to make, and only use small pieces of patterned paper and ribbon. So they are great for using up some of those scraps that we all have in our stash.

Materials needed
hot glue gun
black ink
6 cm diameter circle from hard cardstock
4 pieces double sided christmas patterened paper 18cm x 2.5cm
4 pieces red cardstock 14cm x 2.5cm
4 pieces double sided christmas patterned paper (different colour) 18cm x 2.5cm
8 pieces christmas coloured ribbon approximately 12cm long x 1cm wide
8 pieces gold ribbon approximately 10cm long x 1.5cm wide
4 pieces of red cardstock 15cm x 0.5cm
4 holly leaves (or leaf punches)
1 red paper flower
1 christmas tag

Here is a picture of the end result


Lets get making
1. Ink the edges of all the strips of patterned paper and cardstock with black ink
2. Using the hot glue gun, glue the short ends of the four strips of ONLY ONE of the patterned paper strips, the red cardstock and all the ribbon pieces together to make a tear drop shape. 
3. Glue the patterned paper shapes to the circle piece of cardstock AS SHOWN

4. Then glue the red cardstock shaped pieces, overlapping some in the middle to make it even, as shown


5. Now glue the 8 pieces of christmas ribbon as shown. Each piece is glued on each side of the red cardstock.


6. Do the same with the 8 pieces of gold ribbon, laying it evenly around the inside.


7. With the 4 thin pieces of cardstock, using a needle or a skewer, roll the card down leaving a 5cm straight piece not curled. I glued the curled piece so it didnt unravel anymore. Bend the end of the straight piece and glue these down evenly, with the curled piece sticking up. As shown


8. With the other patterned paper strips, gently roll these using a pencil, and glue the rolled bit so it doesn't unravel and layer these as shown into the centre.


9. Layer the 4 holly leaves over those rolled pieces of patterned paper, so that you can still see the patterned paper. Glue the flower in the centre and then bend the bottom of the christmas tag and glue this on top of the flower.


Give it a try. It really is so easy. Here are some others that made, changing the length of the strips to make them smaller.


HAVE FUN!!!!!!
Kirsten

Monday, November 28, 2011

Time is Nearly Up...

If you would like to join in our November layout challenges, you still have two more days to enter. Here's what I have recently found in my inbox:
Sketch Challenge - Rachel Funnel
That brick background is awesome!
Sketch Challenge - Gillian Hume
What fantastic colours, and isn't she a little cutie!
Sketch Challenge - Madeylim
How sweet are those photos?
Inspiration Challenge - Pam Casey
That cluster of orange flowers is beautiful!
Don't forget, you have until midnight 30th November to join in the fun. Otherwise you'll just have to wait for the December challenges...and I cannot wait to share those with you!!!! Here's a hint - we are not being traditional this year. (-:

Saturday, November 26, 2011

Cute and Fun Kits!!

Are you looking for a cute and fun kit for those great pictures of your kids, pets, or fun adventures?  I have created some great pages with those wonderful bright colors for just that, plus you get and added bonus card!! 


"You Shine", "Beautiful" and "Tooth Fairy" - 3 single page layouts by Design Team member Erin Reed.

Included In This Kit:
3 sheets cardstock; 4 sheets Bo-Bunny papers; Twiddleybitz chipboard shapes; Bo-Bunny rub-ons; Ruby Rocket ATC transparency; Doodlebug glitter alphas; rhinestones; mixed flowers; assorted ribbons.
Additional Items Required:
Adhesive of choice; paper trimmer; various paints in co-ordinating colours; brown pen; brown ink; ruler; paper piercer (or needle); foam mat (or old mouse pad); photos.

Head on over to Scrapping with V to get your kit before they are gone!!  These kits would also make great presents!!

Enjoy!!

Erin R.

Friday, November 25, 2011

Adding Texture With Embossing

Hello friends! Leah here today! Yesterday was Thanksgiving and all I can say is...thank goodness for leftovers! LOL! Because just only one meal like that isn't enough! I am excited to come by today and talk about adding texture to your projects by embossing.

Embossing is not only easy but it can be an inexpensive tool as well. For example for wet embossing we are talking about a heat gun, a watermark ink pad and embossing powder. Now dry embossing means a machine and buying embossing folders but those can be relatively cheap and there are a ton of machines at many price points.

Either way, the details are incredible!

Here are some examples..


I love this example of embossing pattern paper. Like the stripe behind the die cut. 


Here is another example with embossed pattern paper. The swirls are subtle but are brought out more by the inking. Edged in Stickles, it's gorgeous in person!


White on white wet embossing adds a neat effect by adding a shining pattern but very subtly.


A watermark stamp provides the pattern but something tone on tone. Embossed with a clear embossing powder.

Again stamping with clear powder but this time, I embossed on vellum. The look is just beautiful!


I think what I like the best is the shine. However there are embossing powders with texture, like distress powder or tinsel. Then with the embossing folders and ink, inking the plastic folders themselves or inking the paper. There really is more options and ideas then you would ever think!

Thanks so much for coming by today! Remember, click on the photos for more details if need be!

Wednesday, November 23, 2011

Drawing + Scrapbooking

Dear all, this is Juanna here with another blog post for the month! Hope all of you are doing well so far. I have been under the weather lately and still trying to get myself back up and better. Weather's pretty erratic all over the globe so please take extra care yeah? (:
So, for this post, first things first, have anyone of you experienced this like me: “why do they not produce certain die-cuts in this particular design or why is that pattern not in season now when I need it?”
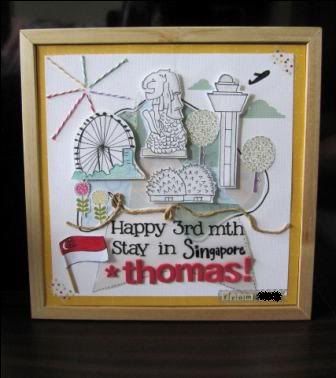
Recently, I was give the privilege of assisting a friend to make a gift for a colleague who was only staying in Singapore (where I come from) for 3 months and she wanted something that would highlight the things that represent my country. It was quite clear that there weren’t scrapbook materials that would fit what she wanted. I tried to look at brochures with images of Singapore tourist attractions but they were either too big to be cut to fit or too small to make out what the picture was.
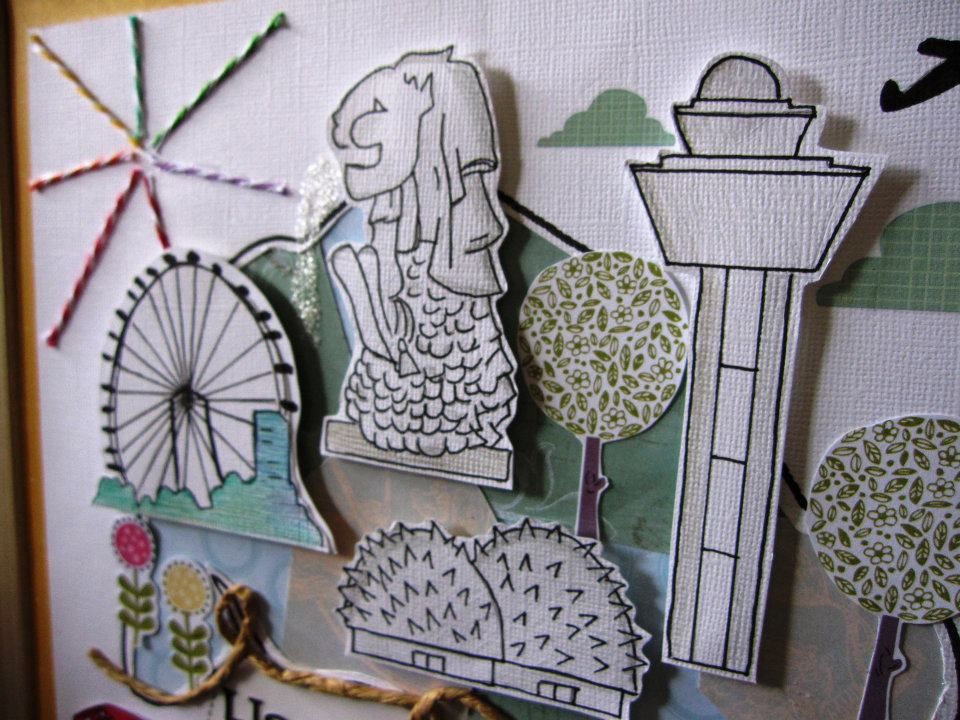
So I decided to draw the pictures I need!
So how did I do that: I sketched on a white cardstock first using a pencil and outlined it using a black scrapbooking marker. I did some light colouring using colour pencils and then trimmed the images for use on my art/ layout.
That solved the problem of not being able to find materials that suits my theme. You can also try doodling directly on your layouts or craft. I will be attempting more doodling and will definitely be back to share. It sure adds that personal touch. (:

Photobucket


Photobucket
(close up of hand drawn images showcasing the different Singapore tourist attractions.)

Have a go at it, will be fun! (: God bless!

Tuesday, November 22, 2011

november sketch challenge


I finally had a little time to do both the November sketch and the November inspiration challenge!
 I love the sketch , it was simple yet elegant, and also, I wanted to do some boy pages, since both of my boys always say that I make more girl pages.. but I feel weird putting flowers on a boy page,,,ya know?I went with some paper from Bobunny, and started building some layers. and what is that "grid" stuff you ask...... well that is "rug skid stop" you place it under your rug to keep it from slipping. looks pretty awesome on there huh?

The inspiration photo was so warm and inviting with all those reds and oranges,, so I tried to incorporate some warmth with my color choices. I used some papers from various companies, and added chipboard,leather,re purposed buttons,feathers and lots of brads.I printed the phrase with Duetica fonts.


Monday, November 21, 2011

Working with Wire

Hi Everyone

Sorry my post is a little late this month i have been sick the last week, but feeling better now.

Helens post was just amazing... what a great idea of using doileys to spruce up your pages.
They add a nice feminine touch.

Along with Helens idea, for the Nov sketch, i decided to try wire on my layouts.

So heres the NOV sketch with the wire i did :)


You can see here i placed the wire below each photo to give it a border


This is working with wire in a somewhat more detailed way. The wire is threaded through the lace.


Close up of threaded lace with flowers..


 This is another way to use wire as well. As you can twist it it lends itself to creating shapes and this is twisted amongst the flowers. It is there LOL!


So theres just some quick ideas to help your girly layouts.
Sticking it down? Well theres a few ways.. thin ds tape, glue dots, (what i use) and staples.
Wire is so versatile.. see what you come up when you have a go.. The beaded wire is fabo!
Once you see what you can do with it, you will keep going back to it.. i do !
Happy Scrapping !
Bek xx

Thursday, November 17, 2011

How to Use Doilies on your Layouts

Hi there everyone!

It's Helen here again and today I'm going to be showing
you some ideas on how to incorporate doilies onto your 
layouts and where to buy them. Here are a few of my own
layouts where I have used various different types of doilies.


Quite a few manufacturers have doilies for sale now,
I have seen them available by Kaisercraft, Maya Road
& Cosmo Cricket, just to name a few...

Of course, if you are able to crochet then you 
can even have a go at making your own!

There are also Etsy shops where you can find them.  
My 2 favourites are here and here.

If you can't find doilies in the colour that you want 
don't despair!  Remember that you can always use mists
to recolour them to whatever colour you want, so if you
are not yet sure of what you are after then buying
some in neutral colours is a good idea as you 
can always custom-dye them to suit your project!

I hope you try them out on your pages soon...
Doilies are really trendy right now!!


Friday, November 11, 2011

Making our own Polaroid frames

Well i don't know if you are anything like me and just love all the Polaroid stamps out there, i myself have 2 different ones that i use ALOT

The first one can be seen in this layout here
and the second one i used on this layout here
As soon as i saw the sketch for this month i new i was going to dig one of the baby's out
So i got my stamps out and was looking out some paper to stamp them on, i love the look of patterned paper as the Polaroid background rather than plain. I dug into a kit i was working with and came across 2 little squares that were 3x3 so i thought hey i will just make my own and use up my scraps at the same time. I cut my pictures down to 2.25x2.25 as i wanted a good border round them to give the effect of a real Polaroid. Once i stuck the pictures down i went round them with my journal pen then i inked the edges of the patterned paper. I really love them and think they look as if they have been stamped.


And if you remember my last post this is not identical to the sketch, i rotated it to make it fit my papers
Hope you like my unstamped Polaroids and hope you try it out yourself, it really makes a change from plain old matting.

See you soon
Caz :)

Wednesday, November 9, 2011

And We Are Off!!!!

We are off the mark! The November entries have started to roll in.
Let's take a look at what I found in my "inbox":
Cherished More Than You Know - Amanda - Inspiration Challenge
Such a sweet layout - those mushrooms are just too cute!
You Made My Life Complete - Leila Inspiration Challenge
Love the bright colours and design. Absolutely gorgeous!
You & Me - Ann Murphy - Inspiration Challenge
Love the border on the circle - it is so pretty and unusual.
Brothers In Arms - Amanda - Sketch Challenge
Love the pop of bright blue and orange - gorgeous colour combination!!!
So, who's next? Come on ladies, show me what you've got!
Entries close 30th November.

Tuesday, November 8, 2011

Drumroll Please...

Ladies, you are making this harder and harder every month. But that is a credit to you all, and the amazing work that you produce.
Without any further delay, our October Challenge winners are:
October Sketch Challenge: Rachel
October Inspiration Challenge: Agnieszka
Thank-you to everyone for all the beautiful work that you have submitted. I look forward to seeing what November brings (and so far it is looking fantastic!!!).
Could the winners please email your postal address to me at scrapbookkitswithjules@gmail.com
Your prize will be posted to you shortly.