
I have a really simple floating frame canvas to share with you today. Created for A2Z Scraplets using the lovely heart frame and Girls title which are both available from our store.
You can make this from scraps you have at home including canvas’s you have bought and not done anything with.
All you will need is
2 x 8 inch canvas’s
1 x sheet of acrylic (from a Kaiser album I didn’t use all the pages, or it could even be a clear sheet of transparency).
2 x A2Z Scraplets Large Floral Heart Frame (1 for the front and 1 for the back.
A2Z Scraplets word “Girls”
Inks and/or Paints
Prima flowers or similar
Prima pearls or other bling
Packing tape (or clear contact if you are wanting a larger photo)
Burnishing tool
Water
Strong wet glue (pritt or pva glue or similar)
 Step 1.
 Paint both canvas’s to desired colour. I have used 2 shades of pink to give a mottle effect. I have also painted the inside of the canvas ‘s too.
Allow the canvas’s to dry.
Step 2.
Once your canvas’s are dry, use your heart frame as a template and trace around the inside of the heart with pencil onto the canvas being careful not to draw onto the timber section. If you hold up to the light you will see where the timber is. Make sure you trace the right way for the canvas at the back.
Using a craft knife, cut out the heart from the canvas cut a little further in from your pencil line so you won’t have any overhang when adhering the frame.
Step 3.
From the heart frame you will use on the back, cut off the flowers as this won’t be seen.
Ink or paint your frames and title in desired colour. I have also used dimensional magic on both the frame and title for added gloss.
Set all of these aside to set and dry.
Step 4.
Place your back canvas on your craft mat, fit your acrylic sheet on top and adhere this to the canvas. Then adhere the top canvas to the acrylic sheet.
Allow to set. Once dry you could use binding tape or a wide ribbon to cover the join in the 2 canvas’s, I haven’t worried about this myself.
Step 5.
Adhere your heart frames to the canvas, the flowers on the front slightly overhang the sides of the canvas. Adhere your flowers over the top of a few of the chipboard flowers. Adhere your title and then bling it up with pearls or rhinestones.
I used a Prima vine and cut it apart to place inside the front and back of the acrylic inside the frame. Adhere with glue but be careful and make sure you have left enough room for your photo and these embellishments won’t cover the photo.
Step 6. – Photo Technique
This may be the easiest and most cost effective way to transfer images. All you need is a colour or black and white photocopy of an image (be sure to use a copier with toner not a inkjet printer – laser printer can be used as this uses toner), regular clear packing tape, a burnishing tool and water.
Using this technique you will end up with a transparent image which you can use either side, so no mirror imaging is required.
Firstly, make a colour photocopy of the item you wish to transfer. If using a photo of 4×6″ reduce the image to 2″ wide which is perfect for packing tape.
Cut out the image you wish to transfer.
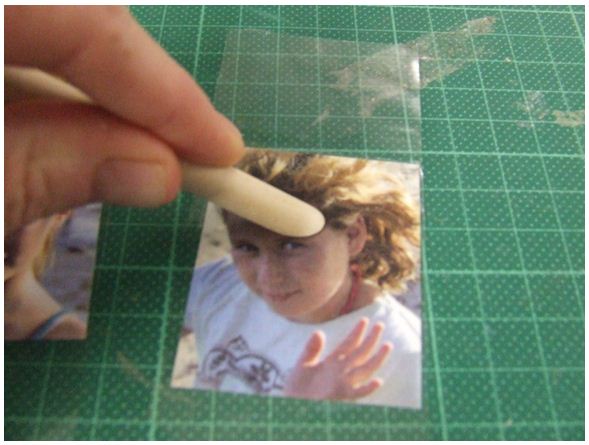
Cover the image with the packing tape and burnish in both directions with a bone folder or other tool.
 Then soak the image in a bowl of warm water for five minutes or more.
Under running water, start rubbing the white (non-tape) side to remove all the paper. You can rub with firm pressure but do not scrape the image as you may damage it.
After all the paper has been removed, blot the area dry with a towel. You will be left with a transparent image on the packing tape.

When image is totally dry, adhere to the acrylic sheet of your floating canvas as you would a transparency with clear glue, or other.
If you would like to use a larger photo or image, rather than use packing tape try using clear contact for a seamless finish.
Then Bob’s your Uncle, your canvas is complete!!
How easy was that??
Hope you enjoyed and give this a try yourself.

11 comments:
WOW!! So gorgeous Ness...and SO CLEVER with that transfer photo technique. Love it. B-)
thats so clever Ness i do like it very much
Ohhhh Ness that is beautiful !! Thank you for sharing love that transfering photos hmm will have to give that a go !! very clever !! xx Tina
What a great idea Floating frame canvas and used with the transfer technique !!!
Fabulous Christmas gift. xxx
This is so pretty, Ness! I will certainly be trying out the tape transfer... I have not been brave enough to try before!
Stunning!! I really love this so much!! Definitely going to try this!
love this....what a clever lady you are :)
awesome Ness, you are a very clever designer love x:)
wow- it's just great!! Need to try if Ican find non ink printer around.. P.S. did you get my mail with pages and instructions? Please let me know
As usual Ness, gorrrgeous work !!
and it looks fabulous!!!
Post a Comment